Implementing the Experiment
This tutorial describes by example how to implement and conduct an experiment with SoPHIE (Software Platform for Human Interaction Experiments). For this purpose, a simple Ultimatum Game will be implemented. Two games with changing roles will be played in order to let each player take both the proposer’s and the responder’s perspective.
Experiment and Treatment
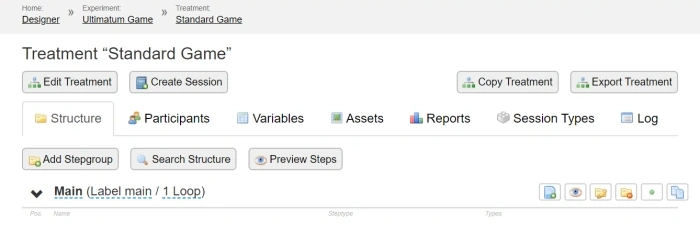
After you have logged in on the admin-site of SoPHIE your installation (e.g. https://test-us.sophielabs.net/login), open the designer to create a new experiment using the Add Experiment function. A name can be chosen freely; in this tutorial you may use ‘Ultimatum Game ‹Your name›’. Afterwards create a new treatment (Add Treatment). Please label this treatment Standard Game. After saving, the new treatment should look as follows:
SoPHIE supports the implementation of experiments in different languages.
To change the language for a treatment, click on Edit Treatment and select the required language under Locale.
Players and Player Types
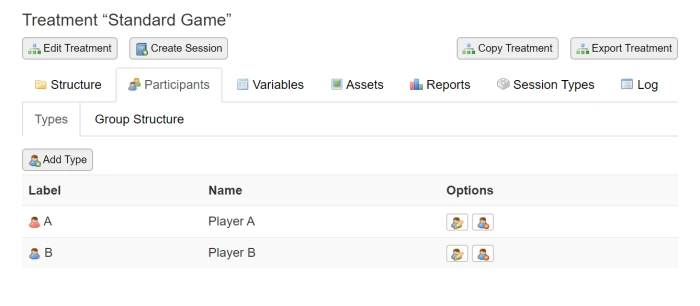
In many experiments it is important to have different types of players. You can create the required types on the tab Participants. In our example we will design two types of players, Player A and Player B. Click on Add Type to create a new Player Type. Please give each type a descriptive name and an appropriate label (in our case ‘A’ and ‘B’). You can also specify a description and choose a corresponding icon for each player type.
Initially the ‘Default Player’ will be created by the system. When it is not needed, you can delete it using the icon.
The result should look as follows:
According to the premises of the Ultimatum Game each group consists of one Player A and one Player B. This group structure has to be configured using the Edit Group Structure button.
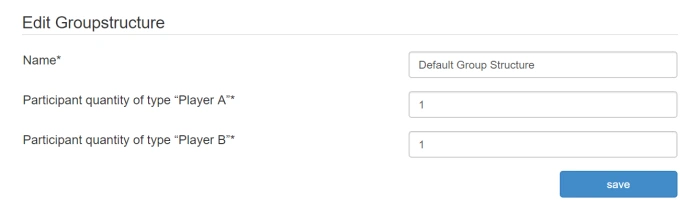
In the initial situation the number of a newly created type per group is equal to 0. Please increase this value to 1 for both player types. This completes the basic setup and you are now ready to begin designing the actual experiment.
The Stepgroups
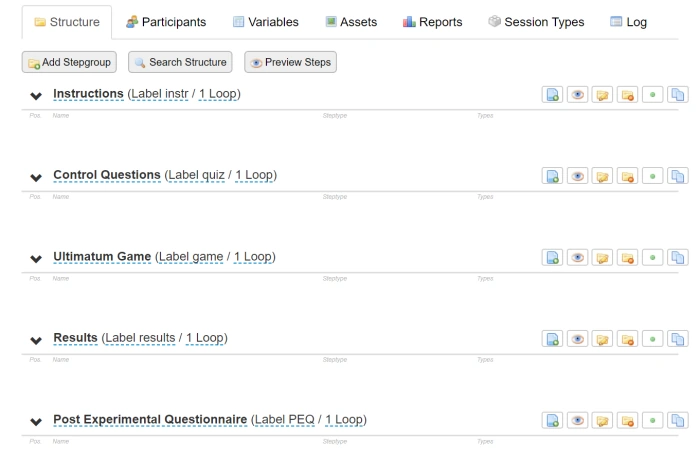
In this step we will learn how to create the schematic structure of an experiment. For our example in the tutorial we need five stepgroups: Instructions, Control Questions, the actual Ultimatum Game, Results and the Post Experimental Questionnaire (PEQ). By using Add Stepgroup, located in the Structure tab, new stepgroups can be created. You can choose any kind of name for your stepgroups, but it is recommended to choose meaningful names. Besides setting a name, it is also important to set a fitting label that is used for the SoPHIE-internal references to a stepgroup. (At this point you can also choose how often a stepgroup should be repeated.)
The automatically created stepgroup ‘Main’ can be deleted by clicking the correspondent icon as well.
The developed schematic structure should look like this:
Instructions
We will start chronologically with the setup of the instructions. The steps in this stepgroup will explain the exact procedure of the experiment. At the beginning we want to have a salutary info step which effectively starts the experiment for the participants. To add a step use the Add Step button ( ) in the stepgroup Instructions row, choose SoPHIE – Presentation → Info as the type and accept your choice by using Add Step now. Give a meaningful description, the Internal Name, which will only be used in the SoPHIEAdministration (in our case ‘Greeting‘). By clicking Add, the step will be saved and you will be redirected to the Edit Step page:
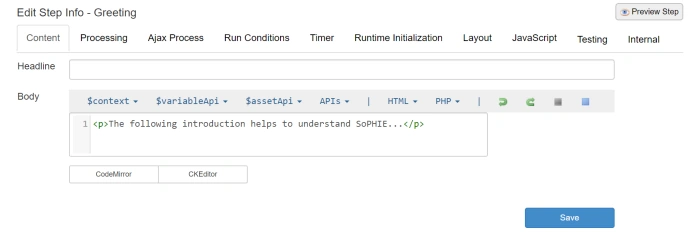
If you want to change the Internal name later on, you can do so on the tab Internal.
In the Content tab we are now able to edit the content of the step that will be shown to the participant. The Headline will be presented in a bold font at the top of the page. The body represents the main content and will be displayed directly below the headline. In this tutorial assign the value “Welcome to the Introduction” to the headline and “The following introductions help understanding SoPHIE…” to the Body.
The Body’s content will be saved as HTML-Code. Here you can choose between two types of editing modes: The CodeMirror view offers a formatting with syntax-highlighting of the source code. Within the CKEditor view you can comfortably edit the content without any knowledge of HTML in a Word-like editor. Editing in the CKEditor mode is indeed comfortable, but also error-prone, so that you should use the CodeMirror mode if you have any basic knowledge of HTML. Further information for the usage of HTML and a good reference is the website: https://www.w3schools.com.
If you have performed all desired changes, it is important to save the current content using Save. In the following this important step will not be mentioned again. But please always remember that changes will only persist if you click Save and wait for the confirmation.
After saving, please go back to the experiment’s structure by selecting your treatment (Standard Game) in the navigation below the main menu. This breadcrumb navigation changes depending on the currently shown element and is used not only for navigation but also for orientation purposes. As long as you are in an element of your treatment you can jump back to the overview screen by clicking on the treatment
Now add another info step to this stepgroup. Name it ‘Instructions UG’ (UG = Ultimatum Game) and describe the experiment’s action in the body. The result in the structure view could look as follows:

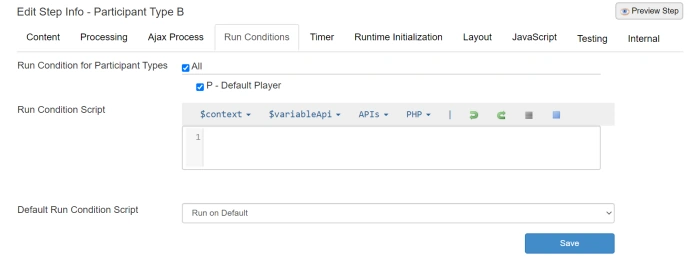
The participants in this experiment are either Player A or Player B. Both player types should be informed about which type of player they are. Therefore, add two more info-steps, one for player type A and one for player type B. As information in this step add ‘You are a participant of type A’ or respectively ‘You are a participant of type B’ (to the corresponding body).
These steps should only be shown to the corresponding player type and the other step will be skipped. To do so, please select each step consecutively and switch to the tab Run Conditions. Choose the corresponding player type in Run Condition for Participant Types. The following figure exemplifies this step for player type B:
Control Questions
In the second stepgroup we want to make sure that all participants understood the instructions by using control questions. Therefore, add another step to this stepgroup of the type Quiz Choice and name it ‘Control question 1’. This steptype generates a control question, in which the participant has to choose between multiple predefined answers by using a radio-button.
In the Quiz tab you are able to choose a headline for this step. Add the question to ask to the field Question. Here you can also use HTML code as in the info steps. So you may give further explanations first and ask a question based on this information. Our question in this tutorial will be ‘Does the Responder have to accept the proposer’s offer in any case?’ You can now define Possible Answers for this question. The required syntax is index:value at which index is a user-defined shortcut and value the shown value. Each row can contain exactly one option. On screen our example should look as follows:

Now add the index of the correct answer to the field Correct Answer, thus ‘n’. By this you have defined the question and the corresponding answer.
If participants give a wrong answer to the question, you need to give an adequate “right” explanation. But also submitting the screen without any choice or choosing the right answer should be confirmed with an individual notice. The shown notices can be adjusted on the Response tab.
In our design you can add an explanation like ‘Correct, the responder can decline the offer’ for Message on correct answer or rather ‘Wrong, the responder may also decline the offer’ for the field Message on incorrect answer. What is shown if the participant chooses no answer can be adjusted using the field Message on empty answer. After saving (Save), please return to the treatment overview.
Ultimatum Game
Now we get to the third stepgroup, the Ultimatum Game. In the first step within this stepgroup we want to assure that all participants have already reached the third stepgroup and aren’t still busy answering the control questions. At this point it is not absolutely necessary to implement this step, but due to the independent conduction of the steps by different participants, waiting times can be aligned within the game.
Therefore, add a Sync Everyone step first. The Headline in this step could be something like ‘Please wait for the other participants…’ The waiting screen, simply shows this message, will appear for participants who already reached this far, until all participants have finished the prior steps.

Next the first offer will be implemented. To implement the choice of the proposed amount for the proposer, add another step of the type Form Input Number and name it ‘Offer’. On the Content tab you are able to add a headline and a content which will be shown above the input form. Fill the field Headline with ‘Please make an offer’ and the Body field with ‘The offer must be between 0 and 10.’
In order to edit the form please switch to the Form tab and add ‘Which amount do you want to offer to the other player?’ to the Form Headline and set the Field Label to ‘Offer’.
Now you need to define how the input of this form will be processed. At first you need to restrict which values will be accepted. To do this, switch to the Processing tab. Only Integer values between 0 and 10 should be accepted. Choose Integer Number for Number Type. Add ‘0’ to Min. Value and ‘10’ to Max. Value. Finally, you need to choose how and where the input of the form will be saved. Give ‘offer’ as Variable Name and ‘Group/Everywhere’ as Variable Context. This means, that the value will be saved for each group in a variable called offer. If you have more than one group the values will not be overwritten. Later on you will learn how to retrieve the input value again, process and evaluate it
The offer should be made by the proposer only, which is Player A in this tutorial. This is achieved by selecting Player A on the Run Conditions tab via Run Condition for Participant Types.
The responder in the Ultimatum Game, player type B, responds to the proposer’s offer. The responder skips the offer step by using the earlier set Run Conditions and gets to a step in which he can react to the offer. In order to ensure that the responder has already made his offer, please add another Sync Everyone Step as you did before
In the following answer step we want to implement two things: On the one hand we have to present the offer of the corresponding proposer to a responder. On the other hand the responders have to accept or decline the presented offer. Please choose a Form Choice step and label it ‘Answer’.
-
Player B should see the available offer of Player A in the field Body. Therefore, first write the sentence ‘The available offer is:’ Now, the earlier saved variable from the offer form needs to be included. This will be done by including a script using the programming language PHP. Using this code is not compatible to the CKEditor mode. Please switch from the CKEditor mode to the CodeMirror mode if necessary. Append the following code to the existing text: <?php echo $variableApi->getGE('offer'); ?> This command uses a function provided by SoPHIE which will be referred to as Application Programming Interface (API). In this context the API will be used to retrieve the group variable offer. The Variable Context GE (= Group / Everywhere) was stated in the previous offer step.
-
The responder should now accept or decline the offer. Therefore write ‘Do you want to accept the offer?’ in the Headline in the Form tab and fill in the Field Options appropriate to the already used format for the definition of the control questions with two rows. The first one contains ‘y:Yes’ and the second one ‘n:No’. In the Processing tab fill in the variable name for saving the input, name it ‘answer’ and save it again in the context of the group (Group / Everywhere).
Finally, you need to assure that only Player B gets to this step by choosing Player B in the Run Conditions tab at Run Conditions by Participant Type.
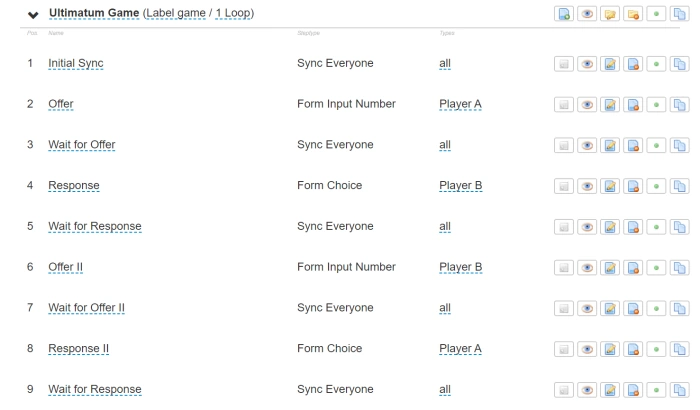
To present both offer and answer step to both players, the last four steps need to be implemented analogously to the steps above. However, attention has to be paid to the fact that now Player B makes the offer and Player A attends the response step. It is also important that the variables are named differently from previously used ones, for example offer2 and answer2.
Additionally, add another Sync Everyone step at the end. The result of the whole stepgroup should look as follows:
Results
In this chapter we will introduce the creation of the stepgroup “results”. Here both participants should be informed about their realized results. Therefore, we need another info step. As headline in Context Headline add ‘Results’. In the Body chronologically add the two combinations of offer and answer. The variable values can be retrieved by using the Variable API as described earlier.
Due to the need of deactivating the CKEditor and if you don’t want to make all specifications in one row, you should add line breaks to the text field in the HTML format. Therefore, add the string ‘<br />’ (br = [line] break) at the designated location.
To highlight the results of each round you should use a bold font for the values. Therefore, use the HTML string <b> and </b>. Texts enclosed in these strings will be printed bold. Thus, add the following text to the body: <b>1. Ultimatum Game</b><br />.
Now, the first offer should be displayed. Additionally, we will save the offer locally for a later usage in a PHP variable called $offer. Therefore, add the following code to the Body.
<?php
$offer = $variableApi->getGE('offer');
?>
Player As offer was: <?php echo $offer; ?><br />
The variable answer contains only the value ‘y’ or ‘n’. In order to show a meaningful text to the participants, we want to realize these values as a conditional output. This concretely means that we want to show a text if the variable contains the value ‘y’ and otherwise another text. The conditional output can again be realized by a PHP script. Therefore, save the variable value of answer locally and use it within a so called if…else control structure.
Add the following code to the Body:
<?php
$answer = $variableApi->getGE('answer');
if ($answer == 'y') {
echo 'Player B accepted the offer.<br />';
} else {
echo 'Player B declined the offer.<br />';
}
?>
Note that the assignment operator is a single equals sign (“=”) while the equality operator is a pair of equals signs (“==”).
Finally, the payout for the just shown offer/answer combination should be presented. The calculation of the payout is also based on a distinction of cases. If the responder accepts the offer the payout for the proposer will be the original amount of 10 minus the offer. The responder’s payout complies with the offer. In the case of a rejection both players will receive 0. The already available local variables $offer and $answer can be used again. By using an if statement you can prove, if $answer contains the value ‘y’ or ‘n’. Complete the rows from above as follows:
<?php
$answer= $variableApi->getGE('answer');
if ($answer == 'n') {
echo 'Player B declined the offer.<br />';
echo 'Therefore, both players receive nothing.<br />';
} else {
echo 'Player B accepted the offer. <br />';
echo 'Player A receives ' . (10 - $offer) . 'Euro.<br />';
echo 'Player B receives '. $offer . ' Euro.<br/>';
}
?>
Duplicate the text above according to the 2nd Ultimatum Game. Keep in mind, that the variables are now saved as offer2 and answer2 and you have to switch Player A and Player B. For a better separation of both areas, you may add the HTML string <hr /> for a horizontal ruler.
The following text contains the complete content for the Body of the result screen including the horizontal ruler.
<b>1st Ultimatum Game<br />
<?php $offer = $variableApi->getGE('offer');?>
Player As offer was: <?php echo $offer; ?><br />
<?php
$answer = $variableApi->getGE('answer');
if ($answer == 'n') {
echo 'Player B declined the offer. <br />';
echo 'Therefore, both players receive nothing.<br />';
} else {
echo 'Player B accepted the offer. <br />';
echo 'Player A receives ' . (10 - $offer) . ' Euro<br />';
echo 'Player B receives ' . $offer. ' Euro<br />';
}
?>
<br />
<hr />
<br />
<b>2nd Ultimatum Game<br />
<?php
$offer = $variableApi->getGE('offer2');
?>
Player Bs offer was: <?php echo $offer; ?><br />
<?php
$answer = $variableApi->getGE('answer2');
if ($answer == 'n') {
echo 'Player A declined the offer.<br />';
echo 'Therefore, both players receive nothing.<br />';
} else {
echo 'Player A accepted the offer.<br />';
echo 'Player B receives ' . (10 - $offer) . ' Euro<br />';
echo 'Player A receives ' . $offer . ' Euro<br />';
}
?>
Post Experimental Questionnaire
The last stepgroup contains a Post Experimental Questionnaire. It is a questionnaire that will be accomplished subsequent to the actual treatment. The individual questions can be realized with the help of different steptypes. For the retrieval of standard disclosures like gender, age, course of studies or simple scales with a radio-button design, the Questionnaire steptype is an easy and fast alternative.
Just add a step of the type Questionnaire to the stepgroup. Simply complement the corresponding details for the standard fields in the Standard tab.
Creating a Session-Type
If you have finished all steps of the first chapter, the experimental design is ready for running a Session. However, in the experiment you have only stated an abstract group structure. For the conduction of the created experiment you would need a group of exactly two participants.
To define how many participants will participate in a session, we can simply multiply the amount of groups by two. Or, vice versa, we can divide the desired amount of participants by two. For testing purposes, create a Session with two groups and four participants.
Next, switch to the treatment overview in the tab Session Types. Click Add Type and enter a name in the form, e. g. ‘2 groups’. Also enter 2 in the field Number of Groups. Finally, click the Save button.
Creating a Session
The creation of a session from a defined Session Type can be done either in the list of Session Types by clicking on the corresponding symbol behind the entry or by using the menu item Session Administration, the button Add Session and the following choice of the desired Session Type from the tree.
Independent of which way you choose you will get to a form to create a session. Please label the session e. g. ‘UG Tutorial, [Your Name]’. By submitting the form you will get to the created session
Conducting a Session
After having created a new session you get to the corresponding interface automatically. Later, you can get to this view at any time by clicking on the menu item Session Administration and by choosing the desired session from the list. Therefore, click on the link Show Details behind the entry of the desired question.
The session view for a session with two groups should look as follows:
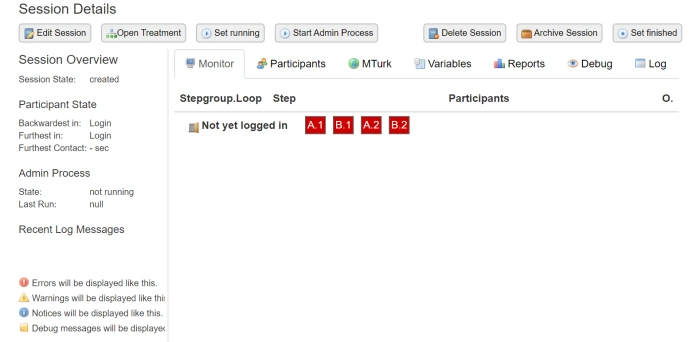
To enable the participants to log into the session you have to create participant codes by the system. These codes can be retrieved in the Reports tab by the link Participant Codes and should be given to the participants. Your participants will open the link https://test-us.sophielabs.net/ in their own browser and get a login form to enter the participant code.
To run a complete test, you should open the browser for all four participants. Normally, only one login as one participant in a browser is allowed at a time. Later logins will simply finish the session of earlier logins within the same browser. This is due to a technical solution (cookies) that is used to store the currently logged in user. This user information is then bound to the used server address and has to be unique. The problem can be solved by using different server addresses to open windows for different participants.
If your SoPHIE Server is configured correctly, you can put a user-defined string ending on a dot in front of the server-name and you should still get to the login form. You can do this either manually or using a debug feature of SoPHIE.
Manually open all four participants the following addresses in different windows or tabs of your browser:
- https://1.test-us.sophielabs.net/
- https://2.test-us.sophielabs.net/
- https://3.test-us.sophielabs.net/
- https://4.test-us.sophielabs.net/
You can log in on all four sites with one of the four participant codes.
An easier way to do this is to switch to the Debug tab and use one of the different options to open the participant windows. In addition to opening the windows this function also logs in the participant automatically, so you do not have to enter the participant codes manually. To open all four windows, click on the button Open below Login all Participants. Please keep in mind that your browser may prevent the automatic opening of windows by a popup blocker. In this case, you will get a notice at the upper window frame which you will need to confirm once more.
After the participants have logged in, they will get a waiting screen with the notice that the experiment has not yet started. This goes back to the session status, which is still at the state created right now. To start the session, please switch to the session view and click on the button Set Running in the upper left corner. Now the session status which is located directly below the button Set Running should change to running. Furthermore, the already logged in participants will be forwarded to the first step. The participants can now continue the experiments until they reach the first Sync Everyone step.
In the session overview on the left side you will find the most important information about the current state of the session. Here you can see at which step the rearmost and the foremost participant is and when the last contact of the participant with the longest idle time has been. If you want to get this information for all participants switch to the tab Participants.
If the first participant reaches the Sync Everyone step the participant will be presented a waiting screen. Only after all participants have reached this step should they get to the next step. The synchronization, as well as the execution of a variety of other functions, is performed by the so called Admin Process. If this process is not running, you will see that the participants in the Sync Everyone step will not get to the next step, even if all participants have already reached the Sync-step. To start the Admin Processes click on the button Start Admin Processes above the session overview.
The execution of the Admin Process depends on the browser window from which it has been started. If you close the window containing the running Admin Process, participants might be held back at a Sync step. To start the process again, open the session details and start the process in this window by using the above button. Next to the menu item Admin Process in the left column you will see if the process has been started in the current window and when it ran lastly.
At the end of the experiment the session status should be set to finished by using Set Finished.
To analyze the results of this session, you can print out the set variables under the tab Variables. You do also have the possibility to export the results to a CSV file. Subsequently, CSV files can be opened and edited easily with Microsoft Excel for a further analysis.
Study Design
Seeing is believing
Experience our Platform today and for free
Need more information? Talk to us now